Getting Started with Gaia
The internet runs on servers you don’t own, serving models you can’t audit, with data you have no visibility into.
Gaia is a different bet. It’s an open-source network of decentralized AI nodes — each one sovereign, each one running an LLM with its own knowledge base, each one accessible as an OpenAI-compatible API endpoint. You run it on your own machine. You own the inference. You control what goes in and what comes out.
This guide walks you through deploying your own Gaia node from scratch. By the end, you’ll have a live node running at your own URL, ready to power any app that speaks OpenAI’s API format.
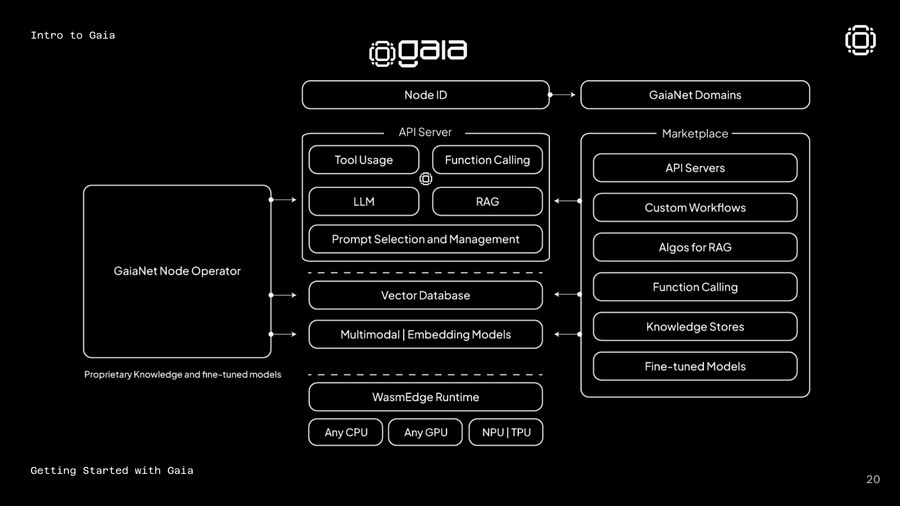
What Is a Gaia Node?

A Gaia node is a self-hosted AI inference service. It runs:
- An LLM (Llama, Qwen, Mistral, or any GGUF-format model)
- A vector database (Qdrant) with your custom knowledge base
- A RAG pipeline that retrieves relevant context before every inference
- A web dashboard and OpenAI-compatible API endpoint
Once running, your node gets a unique address on the Gaia network — something like https://0xf639...us.gaianet.network — and anyone (or any agent) can query it like they’d query ChatGPT.
![]()
The network has grown to 710,000+ nodes running over 30 trillion inferences. It integrates with Coinbase, EigenLayer, ENS, MetaMask, and 110+ other partners. If you want to understand why, this piece covers the $20M raise and the thesis behind it.
What You Need
- Mac or Linux (Windows via WSL2 works too)
- 8GB RAM minimum (16GB recommended for larger models)
- 20GB free disk space (models are large)
- A terminal
That’s it. No Docker, no cloud account, no API key.
Install
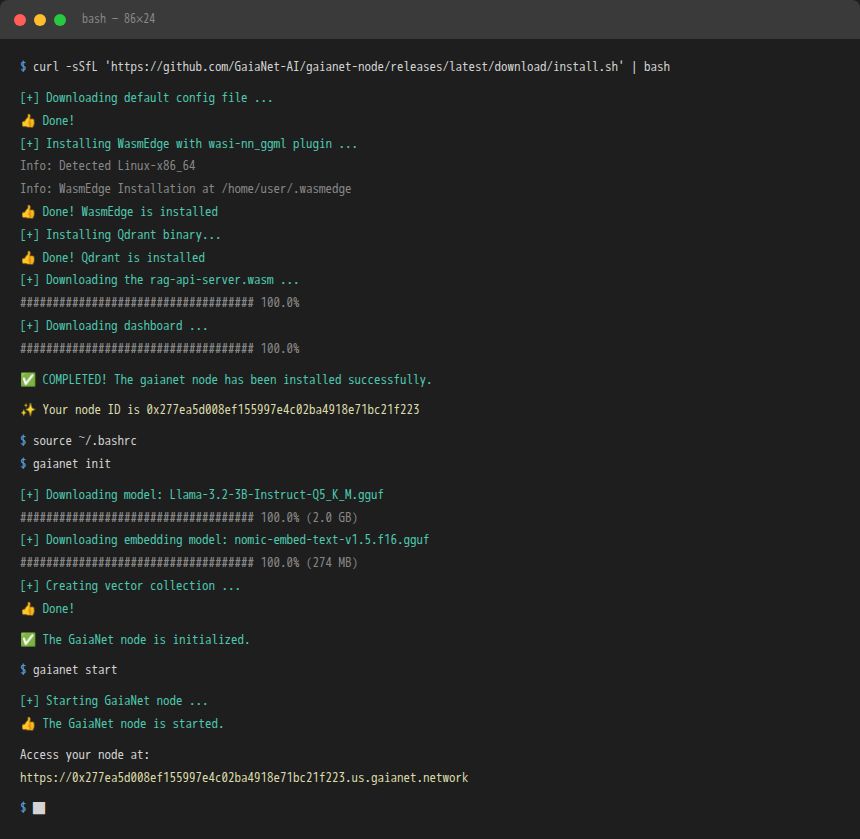
One command installs the full stack — WasmEdge runtime, Qdrant vector database, the RAG server, and the dashboard:
curl -sSfL 'https://github.com/GaiaNet-AI/gaianet-node/releases/latest/download/install.sh' | bashWhen it finishes, follow the prompt to set your PATH:
source ~/.bashrc
# or on Mac:
source ~/.zshrc
You’ll see output like this as it installs:
[+] Downloading default config file ...
[+] Installing WasmEdge with wasi-nn_ggml plugin ...
[+] Installing Qdrant binary...
[+] Downloading the rag-api-server.wasm ...
[+] Downloading dashboard ...
Initialize
This downloads the default model (Llama 3 8B) and sets up your vector database. It takes a few minutes — the model file is a few gigabytes.
gaianet initWant a different model? Edit ~/gaianet/config.json before running init. You can point it to any GGUF model hosted on Hugging Face. Check our Hugging Face repo for specialized models.
 The awesome-gaia repo has a curated list of pre-configured node setups for different use cases.
Start
gaianet startYour node is now live. The terminal prints your node address:
... ... https://0xf63939431ee11267f4855a166e11cc44d24960c0.us.gaianet.networkOpen that URL in a browser. You’ll see your node dashboard — model info, knowledge base stats, and a chat interface. Try it.
Stop
gaianet stop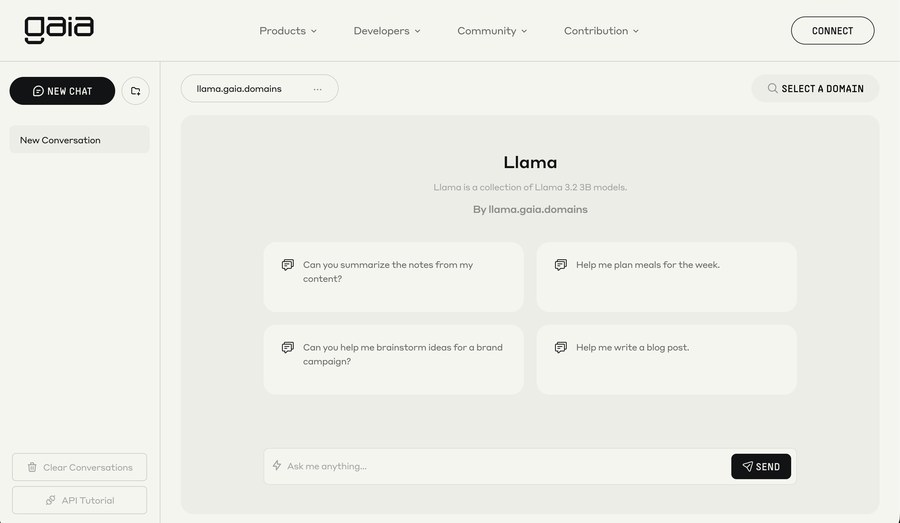
Use It Like OpenAI
Your node exposes an OpenAI-compatible API. Swap out the base URL in any app that uses OpenAI:
from openai import OpenAI

client = OpenAI(
    base_url="https://YOUR-NODE-ADDRESS.gaianet.network/v1",
    api_key="GAIA"  # any string works
)

response = client.chat.completions.create(
    model="llama",
    messages=[{"role": "user", "content": "What is Gaia?"}]
)
print(response.choices[0].message.content)
This works with any OpenAI-compatible tool — Cursor, AnythingLLM, OpenWebUI, Obsidian, Dify, LangChain, and more. Your node, their interface.
Add Your Own Knowledge
The real power is custom knowledge bases.
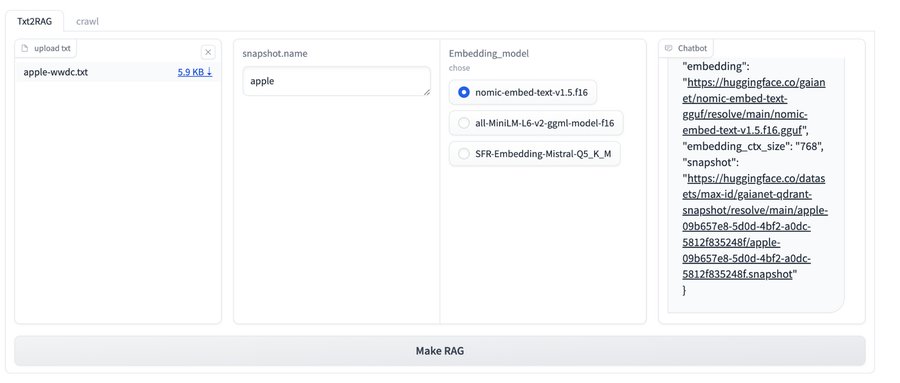 You can load any domain-specific data into your node’s vector store:
# Convert a text file to embeddings
gaianet embed --text my-knowledge-base.txt

# Rebuild the vector database
gaianet init --skip-download
Guides for converting different formats:
Deploy to the Network
Once your node is running locally, you can register it on the Gaia network so other agents and apps can discover and use it.
gaianet infoThis prints your node ID and public address. You can then register at gaianet.ai to get your node listed in the discovery network.
What to Build Next
Once your node is running, you can:
- Connect it to Cursor IDE as a private AI coding assistant (guide)
- Build a Telegram bot with Coinbase AgentKit + your node (guide)
- Spin up a voice chat interface — whisper + LLM + TTS on one node (demo)
- Power an AI agent that uses your knowledge base for specialized reasoning
- Join the network and earn rewards for serving inference to other agents
Resources
| Resource | Link |
|---|---|
| Official docs | docs.gaianet.ai |
| GitHub | GaiaNet-AI/gaianet-node |
| Awesome Gaia (community builds) | awesome-gaia |
| Node installation walkthrough | YouTube |
| Spinning up your own node | YouTube |
| 69+ projects to build on Gaia | Mirror |
| Discord | discord.gg/gaianet-ai |
| Telegram | t.me/gaianet |
The node is running. The network is live. The inference is yours.